Are You Ready For Some Football?

comments 8
Appetizer

dsc_2687
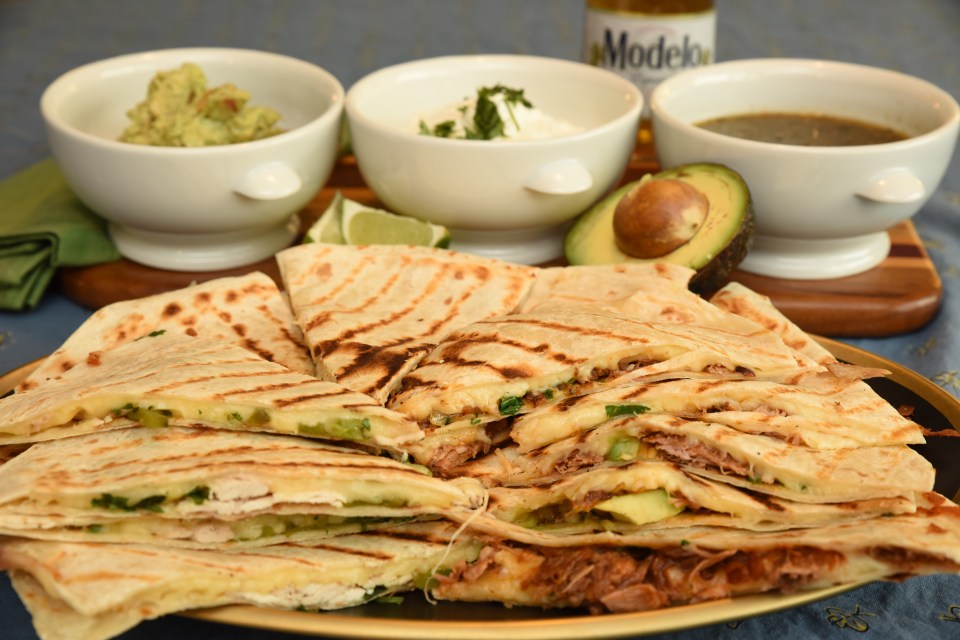
Quesadillas two ways

Southwest BBQ Pork with caramelized onions avocado and cilantro & Green Chile and Chicken

My favorite part of Super Bowl Sunday is the food and commercials…  Shocking, I know!  When having a Super Bowl party finger food is your best bet.  You need one free hand for the high-five, or a cold beer.  Quesadillas are perfect for game day because they are delicious.  They even taste great at room temperature.  Expedite this appetizer with some pre-made ingredients from the store to make sure everything is ready before kickoff.  Sit back and enjoy the commercials…  I mean game!

Time-1 hour 15 minutes

Servings-8

Ingredients

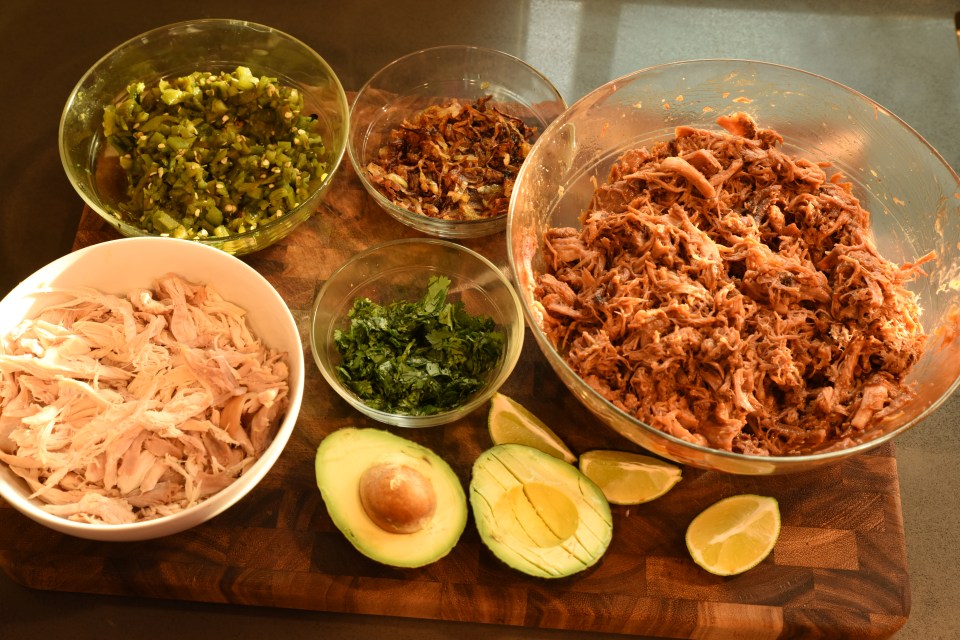
1 rotisserie chicken, 1 40 oz package of pre-cooked carnitas, 4 burrito size flour tortillas, 1 cup of your favorite barbecue sauce, 1 onion, 3 poblanos, 5 jalapeños, 1 2.2 LB of shredded Mexican cheese, 1 avocado, 1 teaspoon of oil, 1 teaspoon of butter, 1/2 bunch of cilantro chopped, sour cream, salsa, guacamole

Preparation of Quesadilla

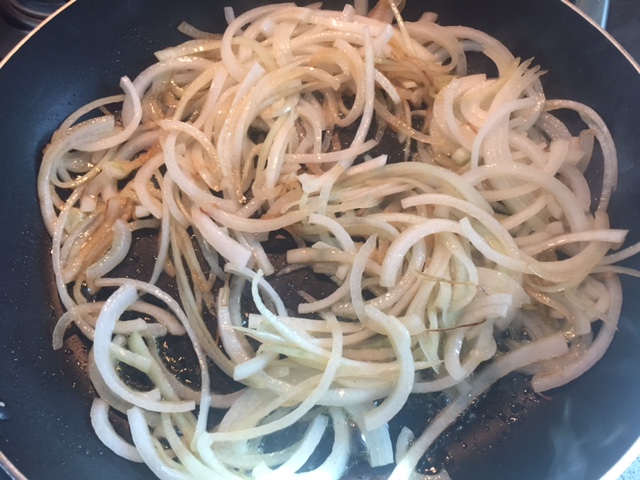
Caramelizing onion start by peeling skin off the onion.  Cut onion in half from tip to root.  Then cut perpendicular to grain and cut thin half moon slivers.  Add oil and butter to skillet on medium high heat.  Add onions and distribute evenly in skillet and coat the onions well in the oil.  Keep an eye on your onions you may need to lower temperature to medium-low to prevent burning.  You can add a teaspoon of sugar to expedite the process and a pinch of salt about 15 minutes into cooking.  If onions look dry you can add a little water.  The onions will turn brown in about 30 minutes.  Remove from skillet and set aside.

img_5818

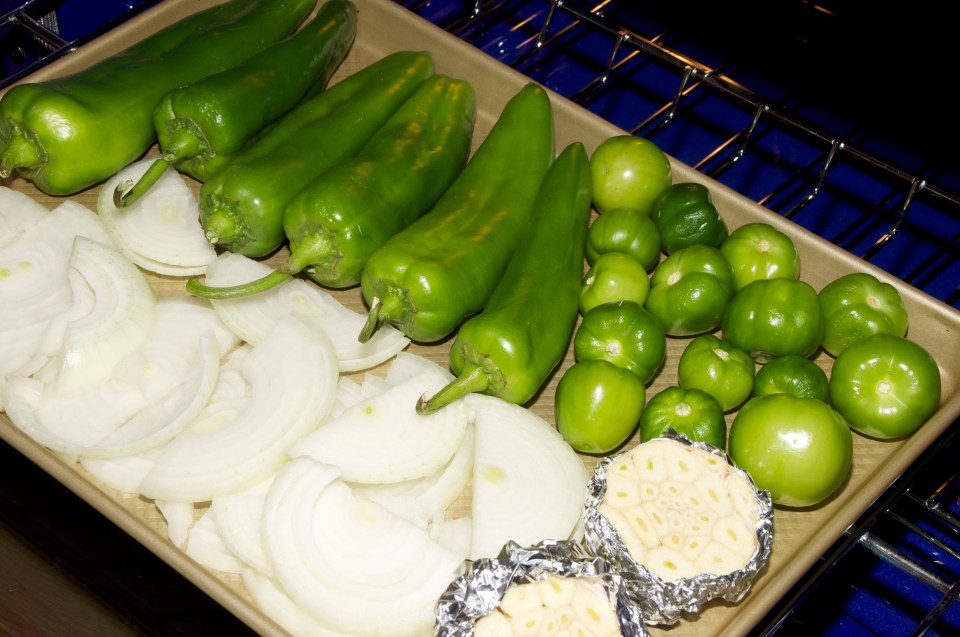
Toasting peppers you can grill the chile peppers stovetop or on open flame.  Place peppers on grill on high-heat.  Blacken evenly then place in a container with lid to steam for 10 minutes.

img_5822

Peel the skin off the peppers with a spoon.  Chop into small pieces and discard stem and skin then set aside.

img_5825

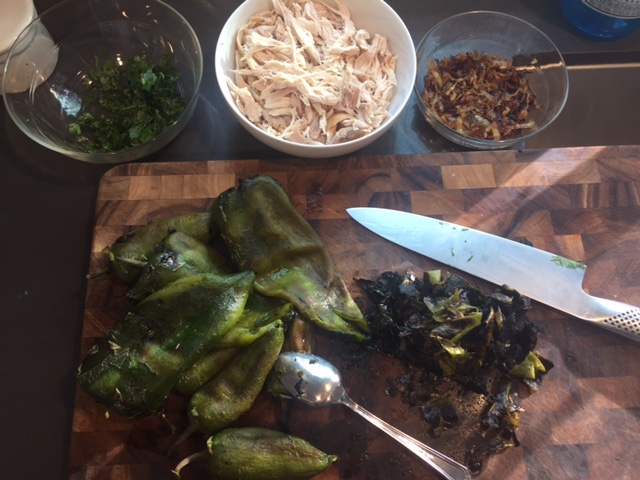
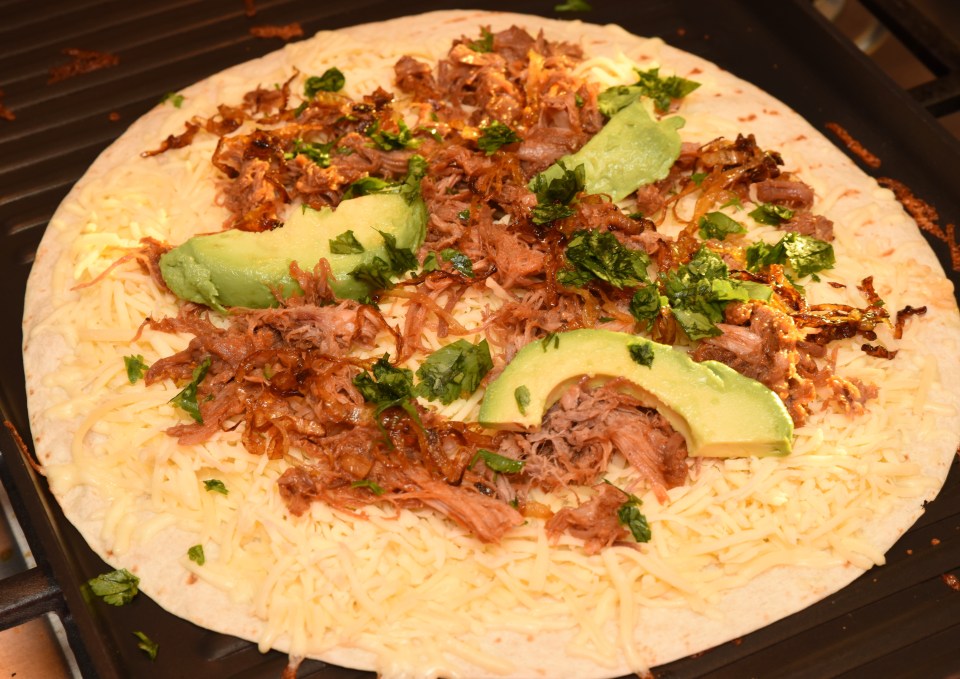
Remove and shred Chicken from carcass and set aside.  Heat up Carnitas according to package instructions and add barbecue sauce and mix until well distributed.  Chop cilantro and set aside.  Open and score avocado and prepare all your toppings to start building your quesadilla.

dsc_2664

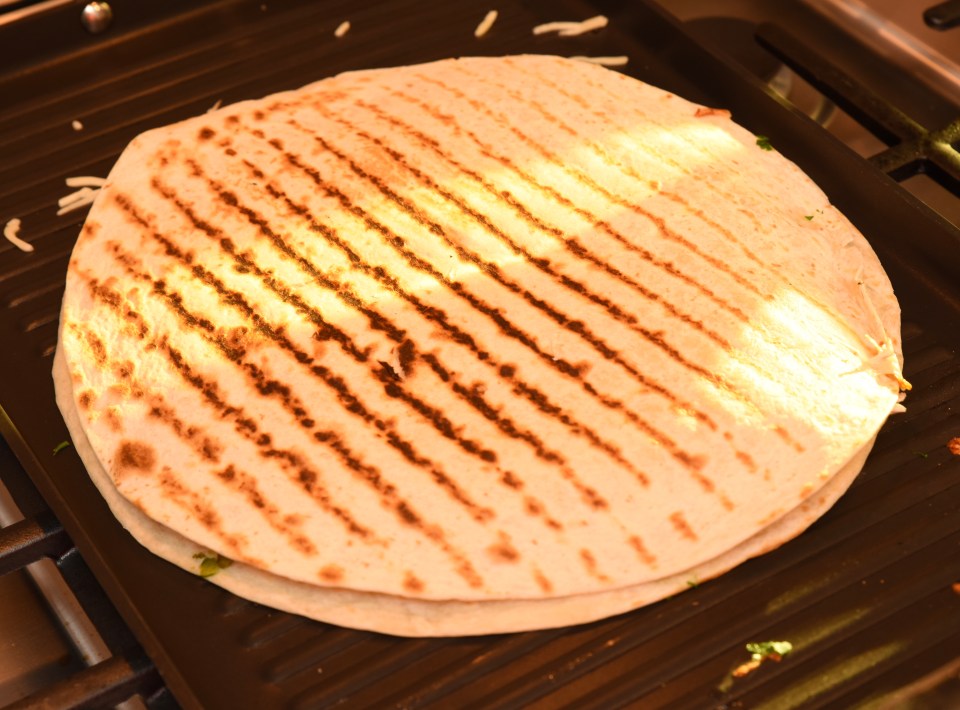
Building the Green Chile Chicken Quesadilla-in a skillet, comal, or griddle lightly toast tortilla on both sides on medium heat.  Then add cheese, chicken, green peppers and cilantro.

fullsizeoutput_c992

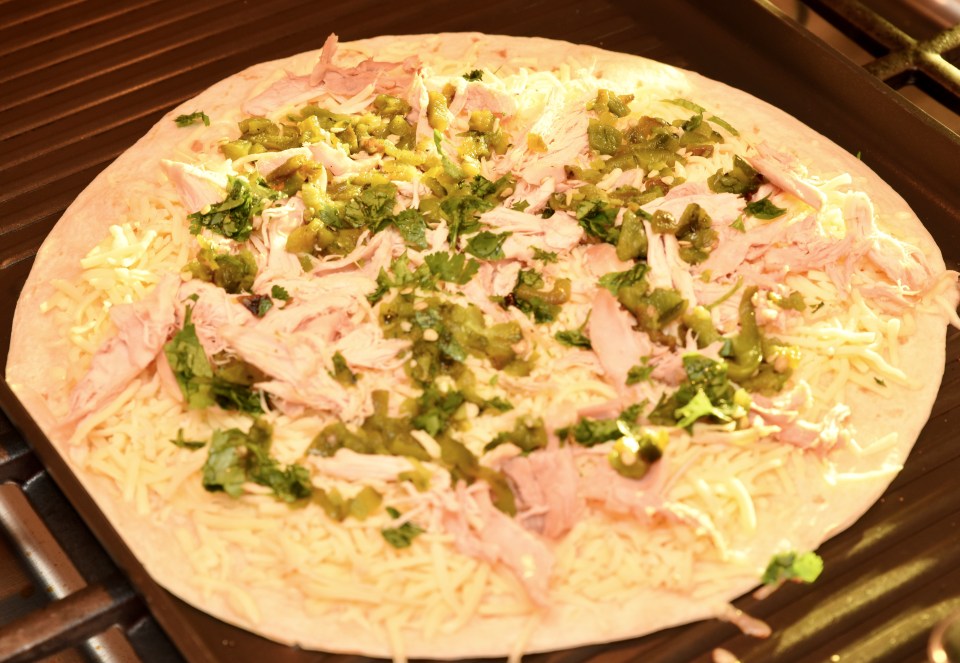
Place second lightly toasted tortilla on top. Allow bottom tortilla to crisp up then flip and toast opposite side. Once cheese is melted take off griddle.  Place on cutting board and cut into 8 slices.

fullsizeoutput_c993

Repeat same method with cheese, pork, onions, cilantro and avocado.

fullsizeoutput_c994The amount of ingredients you use is entirely up to you.  Remember the cheese is the star of any quesadilla.  Serve with guacamole, sour cream, and salsa.

fullsizeoutput_c995
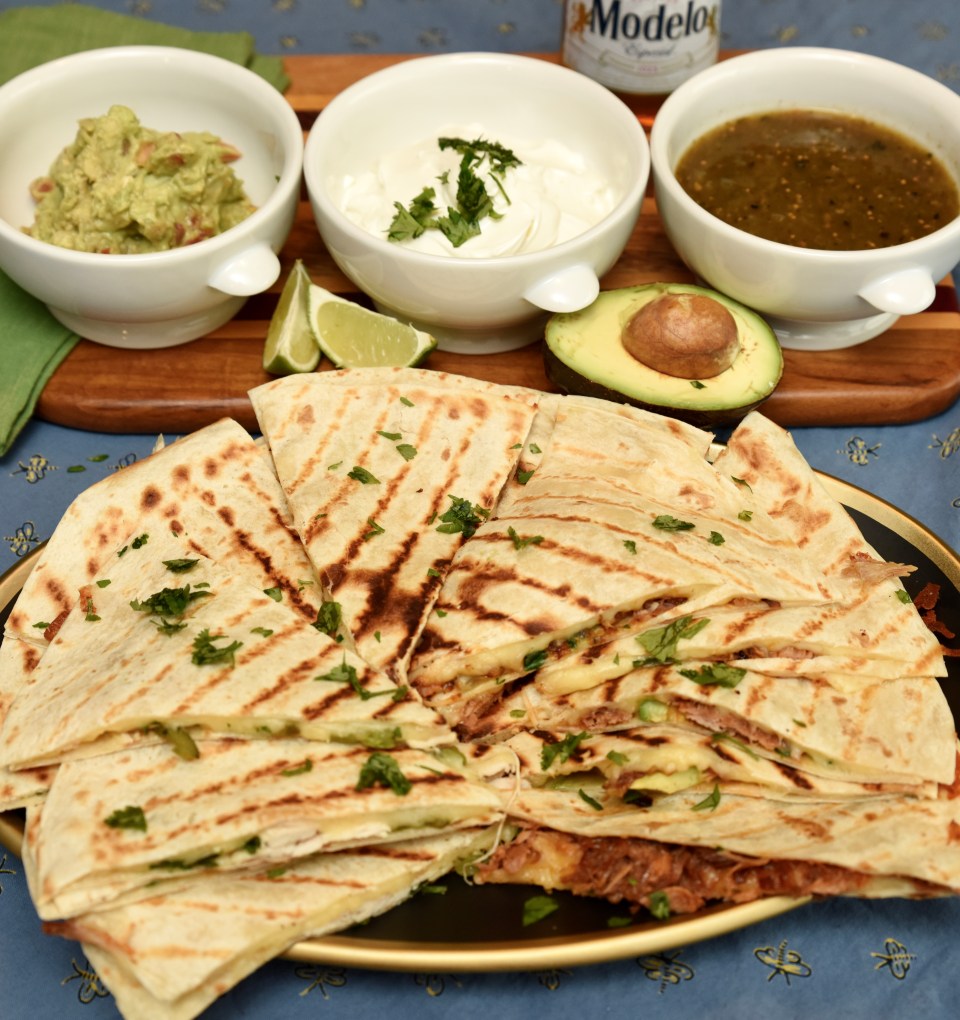
Enjoy with cold beers and good friends.

Cook’s Note:

  1.  Costco has two products I really like to use for the quesadillas.  Del Real Carnitas and Supremo Chihuahua Shredded Quesadilla Cheese.
  2. You will have left over ingredients depending if you only make the amount blogged. I made chicken enchiladas with my left over chicken.  Pulled pork sliders with the left over pork.  I blended the left over chiles with some canned tomatillos, cilantro, onion and garlic for a fresh salsa verde.  Waste not want not.
  3. I used Baby Ray’s barbecue sauce.
  4. For great guacamole and salsa recipes see previous blogs.  Take a Break. It’s Labor Day and Don’t tell anyone I told you this secret! Find under appetizer.

Nana’s Hot Chocolate

comments 5
Mexican

MEXICAN HOT CHOCOLATE

My Nana (Grandmother) used to make Mexican hot chocolate for my cousins and I during Christmas time.  The taste and smell really take me back to childhood.  It’s a cherished memory.  We have had our fair share of cold and rainy nights this year in California.  These rainy nights are perfect for pajamas and Mexican hot chocolate.  Find a cozy, quiet spot in your house and enjoy a silky smooth cup of chocolate.  It’s easy to make, and I will show you how to fancy-it up.

Time-10 minutes

Servings-2

Ingredients

2 cups of milk (whole/lowfat), 1 block of Abuelita/Ibarra chocolate, 1/2 cup of milk for frothing, hersheys milk chocolate for design.

Preparation of Mexican Hot Chocolate

On medium-high heat add milk in an aluminum pitcher or deep pot.  Warm milk to almost boiling.

dsc_2539

The chocolate is already scored for you.  Cut into triangle pieces for easier melting.

dsc_2537

Add chocolate into warm milk and use whisk or the traditional Molinillo to whip the chocolate milk for 5 minutes to thicken and make the chocolate smooth.  While chocolate is melting place your extra milk into frother.  Once chocolate looks slightly thick and smooth pour into cups.

fullsizeoutput_c917
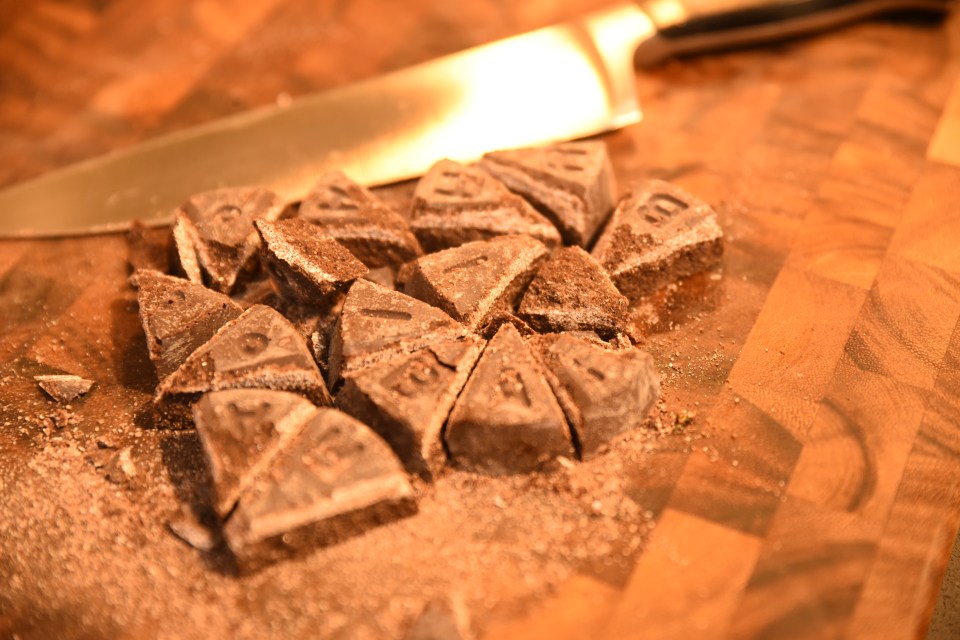
Add frothed milk to hot chocolate.  It should sit right on top leaving a little edge of chocolate on the perimeter.fullsizeoutput_c918With hershey’s syrup you can make a zig zag pattern or circular pattern.

fullsizeoutput_c911Using a toothpick run it perpendicular to the zig zag pattern.  For the circular pattern take the toothpick from the outside of the circle and bring it to the center most part to create a flower design.

fullsizeoutput_c914Enjoy!

Cook’s Note:

  1. This blog is dedicated to my Nana who passed away 2 years ago today.
  2. Milk is not a liquid you can walk away from when on the stovetop.  When it hits it’s boiling point it rises and spills over very quickly.
  3. See foodie field trips tab at top of my blog to find where you can find a restaurant that does it right.
  4. Mexican hot chocolate is different because it is infused with cinnamon.

fullsizerender

Breakfast Nachos

comments 10
Breakfast / Mexican

dsc_2506
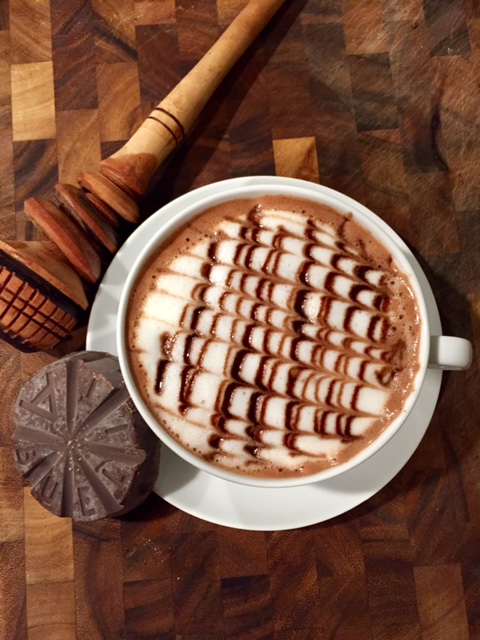
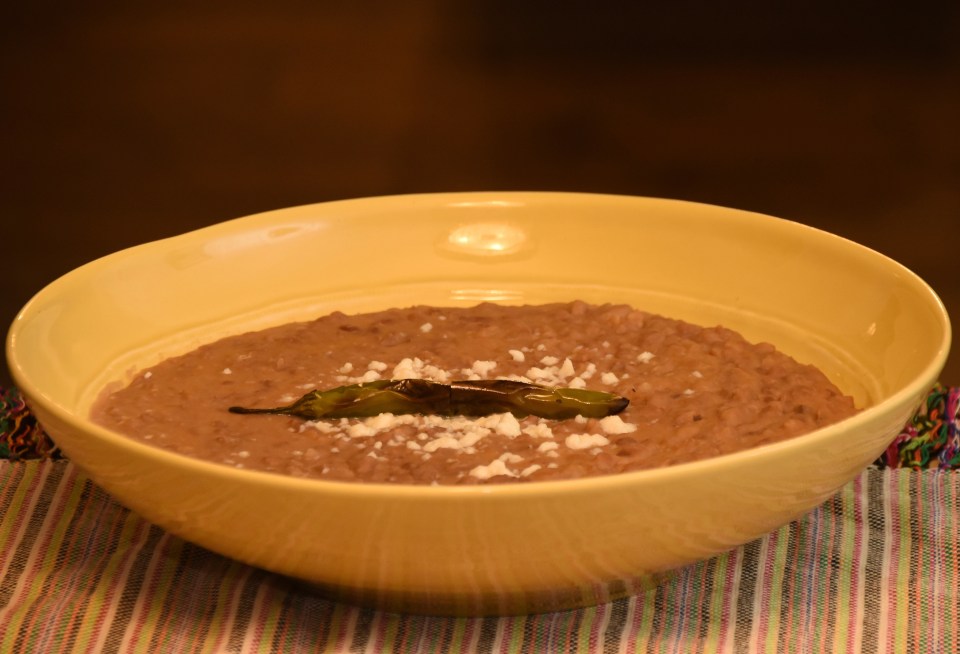
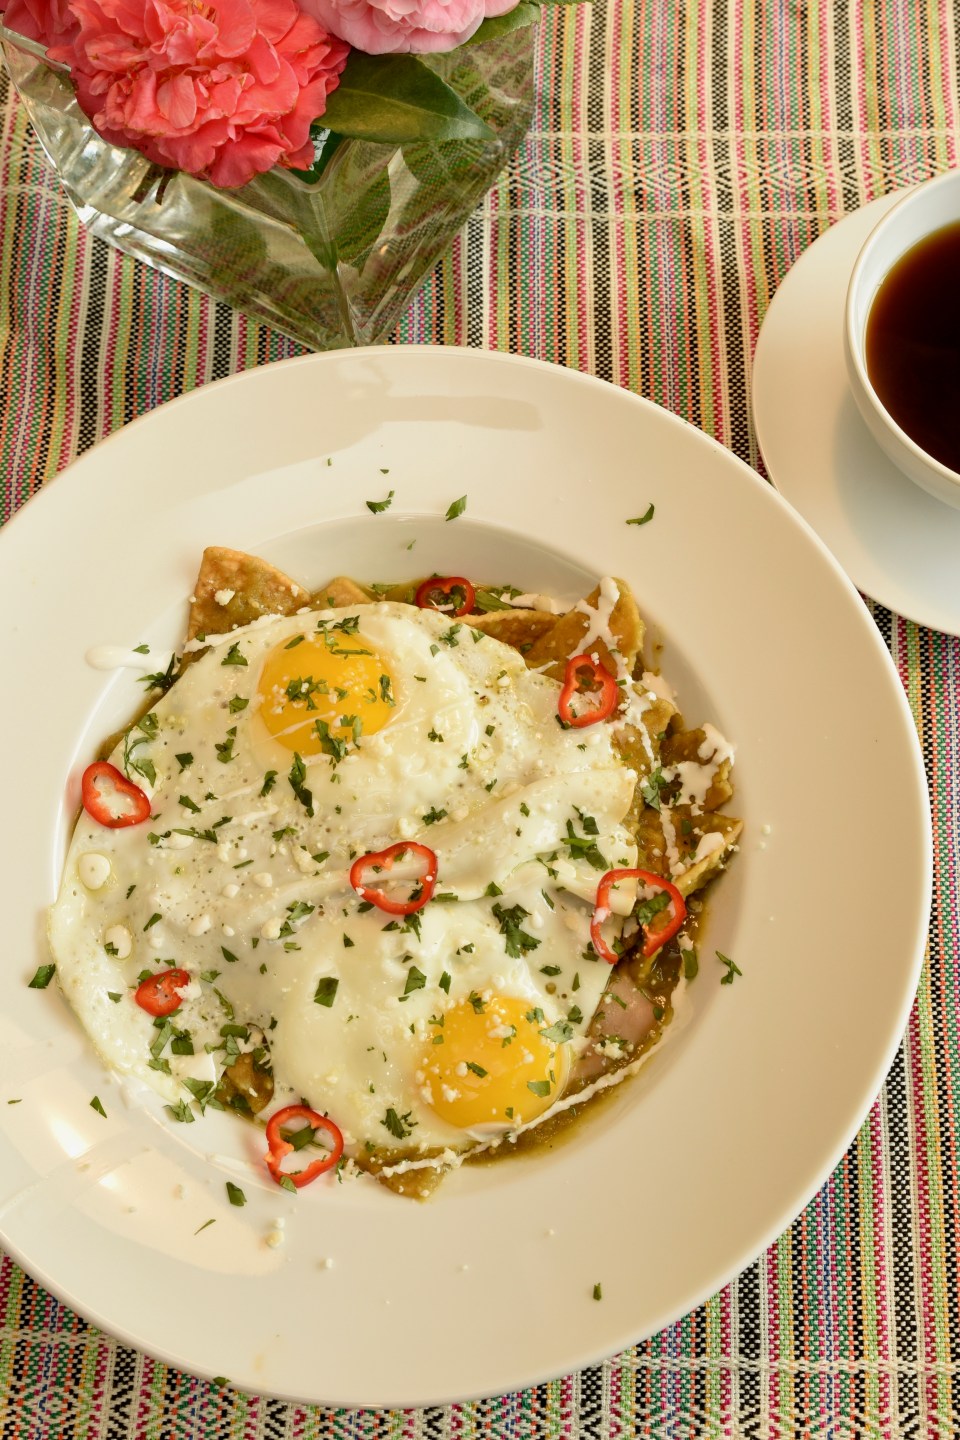
Chilaquiles with Salsa Verde

Breakfast is one of my favorite meals of the day.  Having a well stocked refrigerator makes life easy when you want something quick and delicious.  This breakfast was ready in less than 10 minutes.  I had left over refried beans and salsa verde.  I try to keep homemade red or green sauce in my refrigerator because it’s healthy, and it adds so much flavor to just about anything.

Time-10 minutes with left overs

Servings-1

Ingredients 

1 1/2 cup of salsa verde, 2 eggs, 1/2 cup refried beans, handful of store bought thick tortilla chips,1 TBS of cotija cheese, 1TBS of cilantro, a few slivers of jalapeños for garnish, 1 tsp of oil for eggs, drizzle of cream and salt to taste over eggs.

Salsa Verde recipe from previous blog Are you ready for a throw down? 6 Anaheim Chiles, 2 Poblanos, 8-10 tomatillos, 1 white onion sliced 1/2 thick, 1 garlic head sliced, 1 cup of water.

Pre-heat oven to 400 degrees F. Place Anahiem/Poblano chile peppers, tomatillos, onions, and garlic on a cookie sheet. The flesh of the garlic should be exposed and foil wrapped around the garlic shells to prevent burning. Drizzle a dab of olive oil over exposed garlic to prevent dryness.   Each of these vegetables finish roasting at different times. The tomatillos will be done in 20 minutes. The onions and garlic will finish in 30 minutes. The chiles will be ready in 40 minutes. When they are done roasting, place the tomatillos, onions, and garlic in a blender. Place the roasted chiles in a sealed, gallon size, ziploc bag. Allow the chiles to sweat in the ziploc bag for 20 minutes. Remove the stems, skin, and seeds from the chiles. Add the chiles and cup of water to the same blender and blend all ingredients until smooth.  Season with 1/2 tsp of salt.

DSC_0008

The variety of peppers is your discretion, add poblanos or jalapeños.  Just fill up the cookie sheet.

Refried Beans recipe from previous blog Back to Basics a Mexican Kitchen

1 lb of pinto beans, 7 cups of water, 1 tsp salt, and 1 bay leaf (optional).  Refried 1/2 cup of shredded jack cheese and charred Serrano pepper.

Spread all the beans on a tabletop and check for rocks. Beans are a product of the earth and when harvested rocks are often mistaken as beans. Place beans in crockpot and throw away rocks. Add water and bay leaf to crock pot but do not salt until beans are cooked. Cook on high with lid on and beans should take 3 hours. Cook on low for 6 hours of cooking time.  When the beans are done fish out bay leaf and season with salt. The beans will be perfect with some queso fresco crumbled on top and served as is.  If you would like to refry them you have a few options. You can sauté some onions in oil and then add cooked beans and use a potato masher and smash until desired consistency. You can add lard or 1/2 cup of shredded jack cheese and mash until refried.  In my household we commonly use cheese and lard on special occasions. I like to char a serrano pepper and dice it up into my beans with some queso fresco.

dsc_2055

Preparation of Chilaquiles

In a 12″ skillet add salsa verde on medium-high heat.  Once salsa is warm add the tortilla chips.

img_5716

Soften and coat tortillas chips for 2-3 minutes.  The key with chilaquiles is the chips should be in between crisp and soggy.  The chip should have some bite to it.  The thicker the tortilla chip the easier it is to find the middle.

Plate the chips and add the refried beans.

img_5717

Fry your eggs in the style you enjoy them.  Finish with eggs, creama, cotija cheese, and cilantro.

dsc_2512

Enjoy!

Back to Basics a Mexican Kitchen

Leave a comment
Mexican

fullsizerender

Refried Beans and Mexican Rice

Beans and rice are a staple in a Mexican household.  Beans alone are welcome in any meal.  Every family has their own special way of preparing beans and rice.  I find a lot of people do not take the time to make homemade beans.  I completely understand because I used to find cooking beans a little burdensome.  Cooking beans in a pot filled with water often times kept you tied to the stovetop making sure the beans aren’t burning, and wondering if they need more water.  When you are short on time the easiest way to make beans is in a crockpot.  Cooking beans in a crockpot gives you the freedom to move about and not worry about water levels on the stovetop.  There are a couple ways to enjoy beans.  Frijoles de la olla, which translates as “beans in a pot,” are not refried.  They are cooked in their own juices to release a caldo, or soup.  The beans sit in a slightly thick bean juice if you will.  Frijoles de la olla are the healthiest way, and in my opinion the most delicious way, to eat beans.  To make the beans spread for family gatherings you can refry them.  Refried beans are the most common way you will see them in restaurants.   To refry them you have to add a fat.  The fat is the cooks choice varying from lard, oil, or cheese.

Every Mexican will tell you that their Mom makes the best rice.  So it should be no surprise when I say my Mom holds the crown.  Mom’s rice is perfect and no matter how hard I try or how many times I’ve watched her, I can not make it as good.  She doesn’t measure anything.  It’s just pure expertise.  This recipe is my best effort to imitate her rice.  In a restaurant you will find drier flakier rice but in a home preparation it’s a little wetter and slightly overcooked on purpose.  Some will add corn and peas in the rice, or simply toss with a little cilantro.

Time-3 hours for Beans 20 minutes for Rice

Servings-6 servings

Ingredients for Beans

1 lb of pinto beans, 7 cups of water, 1 tsp salt, and 1 bay leaf (optional).

Refried 1/2 cup of shredded jack cheese and charred Serrano pepper.

Ingredients for Rice

1 cup of high quality long grain rice, 1 TBS olive oil, 1 8 ounce can of tomato sauce, 1 1/2 tsp of kosher salt, 1 1/2 tsp of granulated garlic, 1 tsp of Mexican oregano, 1/4 tsp of cumin, 2 cups of water,  and cilantro for garnish.

Preparation of Beans

Spread all the beans on a tabletop and check for rocks.  Beans are a product of the earth and when harvested rocks are often mistaken as beans.  Place beans in crockpot and throw away rocks.

img_4650

Rocks to the left

Add water and bay leaf to crock pot but do not salt until beans are cooked.  Cook on high with lid on and beans should take 3 hours.  Cook on low for 6 hours of cooking time.

img_4652

When the beans are done fish out bay leaf and season with salt.  The beans will be perfect with some queso fresco crumbled on top and served as is.

img_4653

If you would like to refry them you have a few options.  You can sauté some onions in oil and then add cooked beans and use a potato masher and smash until desired consistency.  You can add lard or 1/2 cup of shredded jack cheese and mash until refried.

img_4684

In my household we commonly use cheese and lard on special occasions.  I like to char a serrano pepper and dice it up into my beans with some queso fresco.

fullsizerender-2

Preparation of Mexican Rice

In a skillet on medium heat add oil and brown rice.  Browning will take rice from bright white to cream colored.  This may take about 2-3 minutes.

img_4654

Add the tomato sauce and reduce until liquid is gone.  Careful tomato sauce may splatter a bit.

img_4656


When tomato sauce has evaporated and looks like the picture above add water.  Place burner on high and season with salt, garlic, cumin and oregano.  Mexican oregano needs to be placed in the palm of your hand and rubbed together to wake up and crush it down to size when adding to the rice.

img_4657

When rice comes to a boil place lid on skillet and reduce burner to low.  Set kitchen timer for 12 minutes and rice will be ready.

img_4658

You can enjoy rice as it is or add any vegetables or herbs to jazz it up.  I like to garnish with micro cilantro.

dsc_2047

Enjoy!

Cook’s Note:

  1.  Jasmine Rice works well if you don’t have long grain rice.
  2. If you prefer to add some heat to the beans add a chile pepper while cooking.
  3. You don’t need to soak beans the night before for this recipe.  However, soaking beans does help with gas associated with the consumption of beans.
  4. If you are soaking your beans, soak for 8 hours.  Discard the soaking water before cooking the beans
  5. Beans freeze really well.  I store them in two cup containers so they are ready when I need them.  You can freeze them up to 8 months.  They can be refrigerated for 3-5 days if covered.


Don’t tell anyone I told you this secret!

comment 1
Appetizer / Mexican

RED AND GREEN SALSA

Want to impress your friends and tell them that you made your own salsa? After tasting this salsa your friends will think you should open your own Mexican restaurant.  All the ingredients are in your pantry and refrigerator.  The blender does all the work and the salsa will be ready in five minutes.   On a 104 degree day, like today in California, you will be thankful not to need your stove.  This salsa is delicious over eggs, tacos, quesadillas, burritos, or simply with tortilla chips.  Will the salsa taste better if you boiled the tomatillos and roasted the tomato or chiles yourself? Yes! Will your friends who do not make salsa be able to tell the difference? No.  Don’t tell them you used canned products.  Your secret is safe with me.  We slaved all day in the kitchen,  right?

Time-5 minutes

Servings-4-6

Ingredients for Green Salsa

1 12 ounce can of whole tomatillos, 1 4 ounce can of diced green chiles hot, palmful of fresh cilantro, 1/4 cup of chopped white onions, 1/2 tsp of garlic powder, and 1/2 tsp of salt.

Ingredients for Red Salsa

1 14.5 ounce can of stewed tomatoes, 1 4 ounce can of diced green chiles hot, palmful of fresh cilantro, 1/4 cup of chopped white onions, 1/2 tsp of garlic powder, and 1/2 tsp of salt.

Green Salsa Preparation

Simply add tomatillos juices drained, green chiles, cilantro, onions, garlic powder, and salt into blender and blend until smooth.  Add 1 tablespoon of water if salsa is a little chunky.

FullSizeRender 6

Any brand will be fine just be sure to drain the juice that the tomatillos are in.  The green chiles come in hot, medium and mild.

Red Salsa Preparation

Simply add stewed tomatoes, chiles, cilantro, onions, garlic powder, and salt into blender and blend until smooth.  Add 1 tablespoon of water if salsa is a little chunky.

IMG_4329

This is what a palmful of cilantro looks like.

FullSizeRender 4

When buying stewed tomatoes you will find Mexican and Italian stewed.  I try an avoid a pre-seasoned tomato.  I want to be able to control where the flavor goes.  Enjoy!

Cook’s note:

  1.  This is just a basic recipe you can experiment with different chiles and varying degrees of heat.
  2. I’ve gotten some feedback from friends that my recipes can be a little complicated.  I wanted to show you that I take shortcuts like anyone else.  An authentic salsa recipe will eventually turn up on my blog.  However, this is a great place to start.
  3. The tomatoes and shredded lettuce in the cover photo is not part of this recipe.  I made tacos tonight while blogging.  Salsa was good with the tacos!